
Mastering Track Changes in Google Docs
Collaboration is key in today’s world, and Google Docs is a fantastic tool for working on documents with others. But with multiple people making edits, keeping track of changes can become a challenge. Fear not, collaborative warriors! This guide will unveil the secrets of using Track Changes in Google Docs, ensuring a smooth and transparent editing experience for you and your team.
The Power of Track Changes
Track Changes allows you to suggest edits to a document without permanently altering the original content. This functionality provides several benefits:
1. Improved Collaboration: Everyone can see the proposed changes and discuss them before finalizing the document.
2. Transparency and Clarity: Track Changes highlights who made what edit, making the revision history clear.
3. Error Prevention: You can review all suggested edits before accepting or rejecting them, minimizing the risk of accidental changes.
Activating Track Changes: Two Simple Methods
There are two ways to enable Track Changes in Google Docs:
1. Menu Bar Magic: Click on “View” in the menu bar and select “Suggesting” (or “Editing” depending on your version). This turns editing mode into suggestion mode, enabling Track Changes.
2. Formatting Bar Shortcut: Click on the down arrow next to the editing mode indicator in the formatting toolbar (usually “Editing“). A menu appears with “Suggesting” as an option. Select that to activate Track Changes.
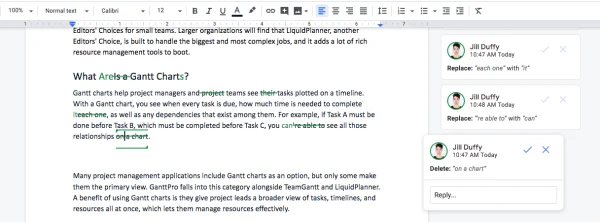
Making Your Edits and Leaving Suggestions
Once Track Changes is enabled, anything you type will be marked as a suggestion. The original text will remain with a strikethrough, and your suggested edit will appear in a different color (usually blue). You can also:
1. Add Comments: Highlight text and click the “Add comment” icon (speech bubble) to leave comments or questions directly on the document.
2. Move Text Around: Use cut, copy, and paste functions to suggest relocating text within the document. Track Changes will highlight these movements.
Accepting or Rejecting Changes: Embracing the Final Draft
After everyone has made their suggestions, it’s time to finalize the document. Here’s how to handle the edits:
1. Accepting Changes: Individually click on each suggested edit and select “Accept” from the pop-up menu. This incorporates the change into the document permanently.
2. Rejecting Changes: Click on the suggested edit and choose “Reject” from the menu. This removes the suggestion from the document.
3. Batch Accept/Reject: For a quicker approach, click on the down arrow next to the editing mode indicator and choose “Accept all changes” or “Reject all changes” (use with caution!).
Turning Off Track Changes: When Collaboration is Complete
Once you’ve finalized the document and accepted or rejected all changes, you can disable Track Changes. Simply navigate back to “View” or the editing mode indicator in the formatting toolbar and choose “Editing.” This will remove the highlights and comments, leaving you with a clean final draft.
Collaboration Made Easy with Track Changes
By mastering Track Changes in Google Docs, you can streamline your collaborative writing process. So next time you’re working on a document with a team, remember this guide and experience the power of clear communication and transparent edits!
FAQs: Keeping Edits in Check – Mastering Track Changes in Google Docs
Q: What is Track Changes in Google Docs, and why is it useful?
A: Track Changes lets you suggest edits to a document without permanently altering the original content. This promotes collaboration by:
- Highlighting proposed changes for discussion.
- Showing who made each edit for clarity.
- Preventing accidental changes by reviewing suggestions before accepting them.
Q: How do I activate Track Changes?
A: There are two ways:
- Menu Bar: Go to “View” and select “Suggesting” (or “Editing” depending on your version).
- Formatting Bar: Click the down arrow next to the editing mode indicator and choose “Suggesting.”
Q: How do I make edits and leave suggestions?
A: Once Track Changes is on, anything you type appears as a suggestion. You can also add comments and move text around, and these will be tracked.
Q: How do I accept or reject changes and finalize the document?
A: Go through each suggestion and choose “Accept” to incorporate it or “Reject” to remove it. For a faster approach, use “Accept all changes” or “Reject all changes” with caution.
Q: How do I turn off Track Changes after finalizing the document?
A: Go back to “View” or the editing mode indicator and select “Editing” to disable Track Changes and remove highlights/comments.
Leave a Reply