How to Set Up Apple Pay

Shares

How to Set Up Apple Pay

Mastering the Future of Transactions: A Step-by-Step Guide on How to Set Up Apple Pay

In today’s fast-paced digital world, mobile payment solutions have become an integral part of our daily lives. Apple Pay, Apple’s mobile payment and digital wallet service, allows users to make secure and convenient transactions using their iPhones, iPads, Apple Watches, and even Macs. If you’re ready to embrace the future of payments, this blog post will guide you through the process of setting up Apple Pay step by step.

Step 1: Ensure Your Device Is Compatible

Before diving into the setup process, make sure your Apple device is compatible with Apple Pay. Apple Pay is available on iPhone starting from the iPhone 6, iPad Air 2 and later, all iPad Pro models, Apple Watches, and Macs with Touch ID or Face ID.

See also  A Comprehensive Guide on How to Use Apple Pay In-Store

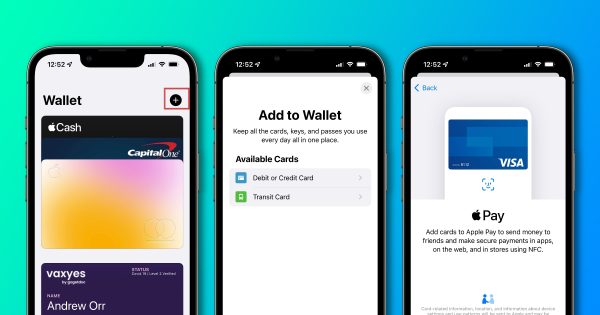
Step 2: Add a Supported Credit or Debit Card

To get started, open the “Wallet” app on your iPhone or iPad. Tap on the “+” sign to add a new card. You can either manually enter your card details or use the device’s camera to capture the information. Apple Pay supports a variety of major credit and debit cards.

Step 3: Verify Your Card

After entering your card details, your bank may require additional verification. This can be done through a one-time code sent via SMS or email. Follow the prompts to complete the verification process.

Step 4: Add Cards to Other Devices

If you have multiple Apple devices, such as an Apple Watch or Mac, you can easily add your cards to these devices as well. Open the “Settings” app on your Apple Watch, or go to “System Preferences” on your Mac, and follow the instructions to add cards to these devices.

Step 5: Enable Touch ID or Face ID

Security is a top priority for Apple Pay. Ensure that Touch ID or Face ID is enabled on your device for an extra layer of protection. You can enable these features in the “Settings” app under “Touch ID & Passcode” or “Face ID & Passcode.”

Step 6: Start Making Payments

Once your cards are added and verified, you’re ready to make payments using Apple Pay. Simply hold your device near a contactless payment terminal and authenticate the transaction using Touch ID or Face ID. On Apple Watch, double-click the side button and hold it near the terminal.

See also  Ultimate Guide to Seamless Digital Payments on Google Pay

Bonus Tip: Use Apple Pay Online

Apple Pay isn’t limited to in-store transactions. You can also use it to make secure online purchases on websites and apps that support Apple Pay. Look for the Apple Pay logo during checkout and follow the prompts on your device.

Conclusion

Knowing how to set up Apple Pay is a straightforward process that enhances the convenience and security of your transactions. With the ability to make secure payments in-store, online, and even within apps, Apple Pay provides a seamless and futuristic approach to managing your finances. Embrace the digital age of payments – set up Apple Pay today and experience the ease of cashless transactions at your fingertips.

Frequently asked questions (FAQs) related to setting up Apple Pay:

Q1: Is Apple Pay available in my country?

A1: Apple Pay is available in numerous countries and regions. To check if it’s available in your country, visit the Apple Pay website or check the “Wallet & Apple Pay” settings on your device.

Q2: Can I use any credit or debit card with Apple Pay?

A2: Apple Pay supports a wide range of major credit and debit cards. Most major banks and financial institutions are compatible, but it’s recommended to check with your specific bank to ensure compatibility.

Q3: How do I know if a store accepts Apple Pay?

A3: Look for the contactless payment symbol at checkout or on the payment terminal. Many stores that accept contactless payments also accept Apple Pay. You can also check Apple’s website for a list of participating retailers.

See also  Don't Sweat the Glitch: A Guide on How to Soft Reset Your iPhone

Q4: Is Apple Pay safe and secure?

A4: Yes, Apple Pay is designed with security in mind. It uses device-specific numbers and unique transaction codes, adding an extra layer of security. Additionally, Touch ID or Face ID authentication is required for each transaction.

Q5: Can I use Apple Pay on my Apple Watch and Mac?

A5: Yes, Apple Pay is compatible with Apple Watch and Macs with Touch ID or Face ID. You can add and use your cards on these devices by following the setup process outlined in the blog post.

Q6: Can I use Apple Pay for online purchases?

A6: Absolutely! Apple Pay can be used for online purchases on websites and apps that support the service. Look for the Apple Pay logo during checkout and follow the prompts to complete your transaction securely.

Q7: What should I do if my device is lost or stolen?

A7: If your Apple device is lost or stolen, you can use the “Find My” app to remotely lock your device or erase your data. Additionally, your payment information is not stored on the device, adding an extra layer of security.

Q8: Can I use Apple Pay with older iPhones?

A8: Apple Pay is available on iPhones starting from the iPhone 6 and newer models. While older devices may not support Apple Pay, it’s always a good idea to check your device’s compatibility in the settings.

Q9: Are there any fees associated with using Apple Pay?

A9: Apple Pay itself does not charge any fees for transactions. However, your bank or credit card issuer may have its own fees or terms associated with the use of Apple Pay. It’s recommended to check with your financial institution for details.

Q10: How do I remove a card from Apple Pay?

A10: To remove a card from Apple Pay, open the “Wallet” app, tap on the card you want to remove, and then tap the three dots in the corner. Select “Remove This Card” and confirm your decision.

Be the first to comment

Leave a Reply

Your email address will not be published.


*