A Comprehensive Guide on How to Use Apple Pay In-Store

Shares

A Comprehensive Guide on How to Use Apple Pay at Stores

How to Use Apple Pay In-Store

Our fast-moving, digital world is changing how we conduct commerce. The introduction of mobile payment methods like Apple Pay, which turn our smartphones into practical and safe wallets, is one example of this trend. We’ll take you step-by-step on how to use Apple Pay in-store, which provides a smooth and contactless payment method.

Setting Up Apple Pay:

Before you can use Apple Pay at stores, you need to set up the feature on your iPhone or Apple Watch.

1. Open the Wallet App: Launch the Wallet app on your iPhone.

2. Tap on Add Credit or Debit Card: Select “Add Credit or Debit Card” and follow the on-screen instructions.

3. Add Your Card: Use your iPhone’s camera to capture your card details or enter them manually.

See also  A Quick Guide on How to Rotate Screen on iPhone

4. Verify Your Card: Verify your card through the verification process provided by your bank.

5. Add Multiple Cards: Repeat the process to add multiple cards if desired.

Using Apple Pay In-Store:

With Apple Pay set up, you can now use it for contactless payments at participating stores.

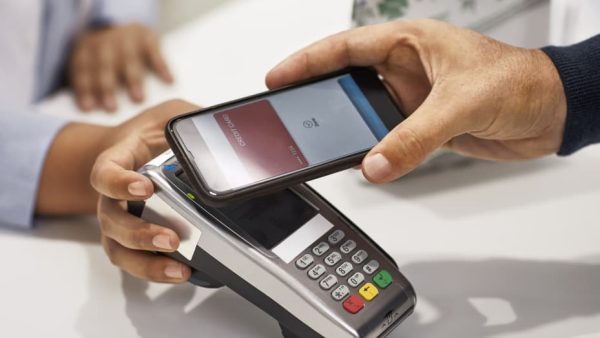
1. Look for the Apple Pay Symbol: When you’re ready to make a purchase, check for the Apple Pay symbol at the payment terminal.

2. Authenticate with Face ID or Touch ID:

  • Double-press the side button on your iPhone or double-press the side button on your Apple Watch.
  • Authenticate using Face ID or Touch ID, depending on your device.

3. Hold Your Device Near the Terminal: Hold your iPhone or Apple Watch near the contactless payment terminal.

4. Wait for Confirmation: Wait for the transaction to process. You might feel a subtle vibration or hear a sound indicating a successful payment.

Security and Privacy:

Understanding the security features of Apple Pay is crucial for a worry-free experience.

1. Tokenization: Apple Pay uses tokenization, a process that replaces your card details with a unique token, ensuring your actual card information remains secure.

2. Secure Element: The Secure Element, a dedicated chip on your device, stores and encrypts payment information.

3. Face ID or Touch ID Authentication: Biometric authentication adds an extra layer of security to every transaction.

Troubleshooting Tips:

In case you encounter any issues while using Apple Pay, here are some troubleshooting tips:

1. Check Compatibility: Ensure the store accepts Apple Pay by looking for the Apple Pay symbol.

2. Verify Card Activation: Confirm that the card you’re using with Apple Pay is active and not expired.

See also  How to Contact Facebook Support

3. Update Software: Keep your iPhone and Apple Watch software up to date to access the latest features and security enhancements.

Conclusion:

Your mobile device becomes a flexible and safe payment method when you use Apple Pay in-store. You may take advantage of Apple Pay’s sophisticated security features and the ease of contactless purchases by following these easy steps. With confidence, bid conventional wallets farewell and welcome the world of payment technologies.

Frequently asked questions (FAQs) about using Apple Pay in-store:

Q1: What is Apple Pay, and how does it work?

A1: Apple Pay is a mobile payment and digital wallet service provided by Apple. It allows users to make secure, contactless payments in stores, online, and within apps using their iPhone, iPad, Apple Watch, or Mac. Apple Pay utilizes features like tokenization and biometric authentication (Face ID or Touch ID) for enhanced security.

Q2: How do I set up Apple Pay on my iPhone?

A2: To set up Apple Pay on your iPhone:

  • Open the Wallet app.
  • Tap “Add Credit or Debit Card” and follow the on-screen instructions to add your card details.
  • Verify your card through the provided verification process.

Q3: Can I use multiple cards with Apple Pay?

A3: Yes, you can add and use multiple credit or debit cards with Apple Pay. Simply repeat the process of adding a card for each additional card you want to include.

Q4: Where can I use Apple Pay for in-store purchases?

A4: You can use Apple Pay at a variety of in-store locations, including retail stores, restaurants, and other businesses that have contactless payment terminals. Look for the Apple Pay symbol or inquire with the cashier.

See also  A Fresh Start: How to Change Your Instagram Username

Q5: How do I make an in-store purchase with Apple Pay?

A5: To make an in-store purchase with Apple Pay:

  • Look for the Apple Pay symbol at the payment terminal.
  • Double-press the side button on your iPhone or Apple Watch.
  • Authenticate with Face ID or Touch ID.
  • Hold your device near the contactless payment terminal.

Q6: Is Apple Pay secure?

A6: Yes, Apple Pay is designed with security in mind. It uses tokenization to replace actual card details with unique tokens, and the Secure Element, a dedicated chip on the device, encrypts and stores payment information. Biometric authentication adds an extra layer of security.

Q7: What should I do if my iPhone or Apple Watch is lost or stolen?

A7: If your iPhone or Apple Watch is lost or stolen, you can use the “Find My” app to remotely lock or erase your device. Additionally, your card details are not stored on the device, adding an extra layer of security.

Q8: Can I use Apple Pay on my Mac for online purchases?

A8: Yes, you can use Apple Pay on your Mac for online purchases that support this payment method. Make sure you are using a Mac with Touch ID or have an iPhone or Apple Watch nearby for authentication.

Q9: Are there any fees associated with using Apple Pay?

A9: Apple Pay itself does not charge any fees for transactions. However, your bank or card issuer may have their own fees or policies, so it’s advisable to check with them.

Q10: How can I troubleshoot issues with using Apple Pay?

A10: If you encounter issues with using Apple Pay, you can:

  • Check if the store accepts Apple Pay.
  • Ensure your card is active and not expired.
  • Keep your iPhone and Apple Watch software up to date.
  • Contact your bank or card issuer for further assistance.

Be the first to comment

Leave a Reply

Your email address will not be published.


*