
How to Delete a Page in Microsoft Word
We’ve all been there. You’re diligently working on your document in Microsoft Word, and oops! You accidentally added an extra page, or maybe you finished a section and that last page is left hanging with nothing but a lonely cursor blinking at you. Don’t worry, being able to delete a page in Word is a breeze. Here’s how to tackle those extra pages and keep your document clean and concise.
Finding the Culprit: Identifying the Page You Want to Delete
Before deleting, you need to locate the specific page you want to remove. Here are a few ways to find it:
1. Visual Navigation: Scroll through your document using the scroll bar or your keyboard’s up/down arrow keys.
2. Page Numbering: If you have page numbering enabled, simply look for the number of the page you want to delete.
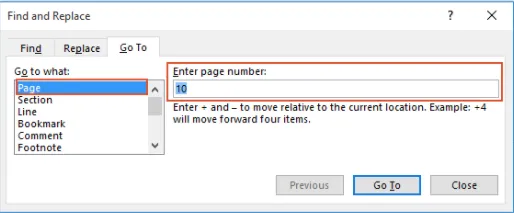
3. Go To Function (Optional): For a quicker search, use the “Go To” function (Ctrl+G on Windows, Command+Option+G on Mac). Enter the page number in the “Enter page number” box and click “Go To.”
The Vanishing Act: Different Ways to Delete a Page in Word
Once you’ve found the unwanted page, it’s deletion time! Here are three effective methods:
Method 1: Using the Backspace or Delete Key
1. Place your cursor anywhere on the unwanted page.
2. Hit Backspace (for PCs) or Delete (for Macs).
Method 2: Selecting and Deleting
This method is useful if the unwanted page has content you don’t need.
1. Click anywhere on the unwanted page to place your cursor.
2. Hold down the Shift key and press the down arrow key until you’ve highlighted the entire page content (text, images, etc.).
3. Press the Delete key on your keyboard. The selected content, including any paragraph marks at the end, will be deleted, effectively removing the page.
Method 3: Navigating with the Navigation Pane (Optional)
This method is helpful if your document has a lot of pages and you prefer a sidebar view for navigation.
1. Go to the View tab at the top of your Word window.
2. Click on “Navigation Pane” in the “Show” section. A sidebar pane will appear on the left side of your document window.
3. Click on the “Pages” tab within the Navigation Pane. You’ll see a list of all the pages in your document.
4. Right-click on the unwanted page number in the list.
5. Select “Delete” from the context menu. The unwanted page will vanish from your document.
Bonus Tip: Avoiding Extra Pages
Here’s a helpful tip to prevent unwanted pages in the first place:
Use the “Insert” Tab: When adding content that might push your text to a new page unintentionally, consider using the “Insert” tab at the top of your screen. From here, you can insert page breaks only when you truly need them, maintaining better control over your document’s layout.
With these simple methods at your disposal, deleting unwanted pages in Microsoft Word is a piece of cake. So go forth, conquer those extra pages, and keep your documents looking their best!
FAQs: Vanishing Pages in Microsoft Word – Keeping Your Document Trim
Q: How can I delete a page in Microsoft Word?
There are three main methods:
1. Backspace/Delete Key (Simple): Place your cursor on the unwanted page (ideally blank) and press Backspace (PC) or Delete (Mac).
2. Select and Delete: Highlight the entire page content (text, images) with Shift+down arrow and press Delete.
3. Navigation Pane (Optional): Open the Navigation Pane (View > Navigation Pane > Pages), right-click the unwanted page number, and choose “Delete.”
Q: How do I find the page I want to delete?
- Scroll through your document visually.
- Look for page numbers (if enabled).
- Use the “Go To” function (Ctrl+G on PC, Command+Option+G on Mac) to enter the page number.
Q: How can I avoid unwanted pages in the future?
Use the “Insert” tab at the top of your screen to insert page breaks only when absolutely necessary, maintaining control over your document’s layout.
Leave a Reply