How to Wipe an iPhone

Shares

How to Wipe an iPhone

A Comprehensive Guide on Securely Wiping Your iPhone: Protecting Your Data and Privacy

In an era where personal data is more valuable than ever, ensuring the secure disposal of information stored on electronic devices is paramount. When it comes to iPhones, wiping your device is not just about getting rid of old data; it’s about safeguarding your privacy and protecting sensitive information. This article provides a step-by-step guide on how to wipe an iPhone securely, minimizing the risk of data breaches and unauthorized access.

1. Back Up Your Data

Before initiating the wiping process, it is crucial to back up your data to prevent any loss of important information. You can use iCloud or iTunes to create a complete backup, ensuring that your photos, contacts, messages, and app data are safely stored.

See also  Here's How to Make a QR Code for Your Google Form

2. Sign Out of iCloud and iTunes

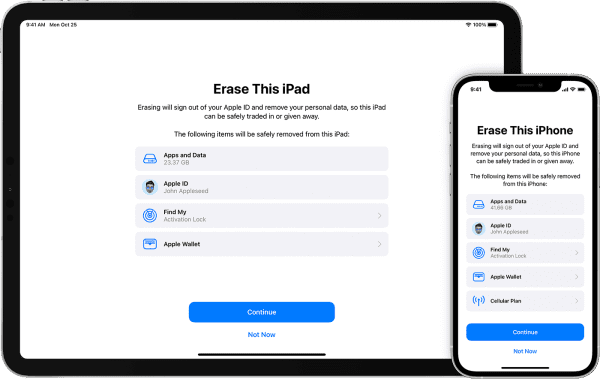
To disassociate your iPhone from your Apple ID and prevent any future access, sign out of iCloud and iTunes. This step is vital for safeguarding your Apple account and ensuring that the device is no longer linked to your personal information.

3. Disable Find My iPhone

Before wiping your iPhone, make sure to disable the “Find My iPhone” feature. This is a security measure implemented by Apple to prevent unauthorized users from erasing or activating a device without the owner’s permission. Navigate to Settings > [Your Name] > Find My > Find My iPhone and turn off the toggle switch.

4. Erase All Content and Settings

To wipe your iPhone completely, go to Settings > General > Reset > Erase All Content and Settings. You may be prompted to enter your passcode and Apple ID password. This step will erase all data on the device, restoring it to its factory settings.

5. Remove Your SIM Card

Before parting with your iPhone, remember to remove the SIM card. The SIM card contains sensitive information, including your phone number and carrier details. Store it securely or transfer it to your new device.

6. Factory Reset Through iTunes

For an additional layer of security, consider performing a factory reset using iTunes. Connect your iPhone to a computer, open iTunes, and select your device. Choose the “Restore iPhone” option to initiate the process. This ensures a thorough wipe, erasing all traces of data.

7. Verify Wiping Completion

After the wiping process is complete, your iPhone will restart and display the initial setup screen. If you see this screen, you can be confident that your device has been successfully wiped. If you encounter any issues, repeat the process or seek assistance from Apple support.

See also  A Blast from the Past: How Much Does the iPhone 8 Cost?

Conclusion

Safeguarding your data and privacy is of utmost importance, especially in an age where digital threats abound. By following these steps to securely wipe your iPhone, you can ensure that your personal information remains confidential and protected. Taking these precautions not only helps prevent identity theft and unauthorized access but also allows you to pass on or recycle your device responsibly.

Frequently Asked Questions (FAQs) related to wiping an iPhone:

Q1: Why should I wipe my iPhone before selling or giving it away?

A: Wiping your iPhone before selling or giving it away is essential to protect your privacy and prevent unauthorized access to your personal information. It ensures that all data, including contacts, messages, and app data, is securely erased, reducing the risk of identity theft or data breaches.

Q2: Is backing up my data necessary before wiping the iPhone?

A: Yes, it is highly recommended to back up your data before wiping your iPhone. Backing up ensures that you have a copy of your important information, such as photos, contacts, and messages, in case you need to restore it on a new device.

Q3: How do I back up my iPhone?

A: You can back up your iPhone using iCloud or iTunes. To back up with iCloud, go to Settings > [Your Name] > iCloud > iCloud Backup, and toggle on iCloud Backup. Alternatively, you can use iTunes by connecting your iPhone to a computer and selecting “Back Up Now.”

Q4: What is the purpose of signing out of iCloud and iTunes?

A: Signing out of iCloud and iTunes is crucial to disassociate your iPhone from your Apple ID. This step prevents any future access to your iCloud account and ensures that the device is no longer linked to your personal information, enhancing the security of your Apple account.

See also  Don't Panic! Here's How to Restore Lost Contacts on Your iPhone

Q5: How do I disable the “Find My iPhone” feature?

A: To disable “Find My iPhone,” go to Settings > [Your Name] > Find My > Find My iPhone, and toggle off the switch. This step is necessary before wiping your iPhone, as it prevents unauthorized users from erasing or activating the device without your permission.

Q6: Can I wipe my iPhone without a passcode?

A: No, you need to have the passcode for your iPhone to initiate the wiping process. The passcode is a security measure to ensure that only the device owner can erase the data. If you’ve forgotten your passcode, you may need to use iTunes to restore your device.

Q7: What should I do after wiping my iPhone?

A: After wiping your iPhone, remove the SIM card, ensure that the device displays the initial setup screen, and verify that all data has been erased. If you’re selling or giving away the device, you can safely hand it over to the new owner or proceed with recycling it responsibly.

Q8: How do I perform a factory reset using iTunes?

A: Connect your iPhone to a computer, open iTunes, and select your device. Choose the “Restore iPhone” option to perform a factory reset. This process provides an additional layer of security, ensuring a thorough wipe of all data on the device.

Q9: What should I do if I encounter issues during the wiping process?

A: If you encounter issues during the wiping process, try repeating the steps. If problems persist, seek assistance from Apple support for guidance and troubleshooting. It’s essential to ensure that the wiping process is completed successfully to protect your data and privacy.

Be the first to comment

Leave a Reply

Your email address will not be published.


*