
How to Set Any Song as Your iPhone Ringtone
Tired of the same old, generic ringtone? Want to personalize your iPhone with a song that gets you pumped (or zen) every time your phone calls? Fear not, music lover! Here’s how to set your favorite song as your iPhone ringtone using the magic of GarageBand, Apple’s free built-in music creation app.
Getting Ready to Rock (or Pop):
Before we dive in, make sure you have the song you want to use saved on your iPhone. You can download it from the iTunes Store or sync it from your computer.
Step 1: Enter the GarageBand Groove
1. Open the GarageBand app on your iPhone.
2. A project creation screen will appear. Choose “Track”.
Step 2: Clip, Clip, Crop
1. A new project with a single instrument track will open. Tap on the “Loop” button in the top left corner. This looks like a magnifying glass icon.
2. Tap on the “Files” tab at the bottom of the screen.
3. Browse through your iPhone’s storage and locate the song you want to use as your ringtone.
4. Tap on the song to import it into your GarageBand project. You’ll see the song waveform appear on the track.
5. Now comes the editing fun! Pinch and zoom in on the waveform to locate the specific part of the song you want as your ringtone. It’s best to choose a short, catchy part that’s easily recognizable.
6. Once you’ve found the perfect clip, tap and hold the yellow handles at the beginning and end of the waveform to adjust the selection. Drag them to precisely choose the ringtone start and end points.
Step 3: Exporting Your Masterpiece Ringtone
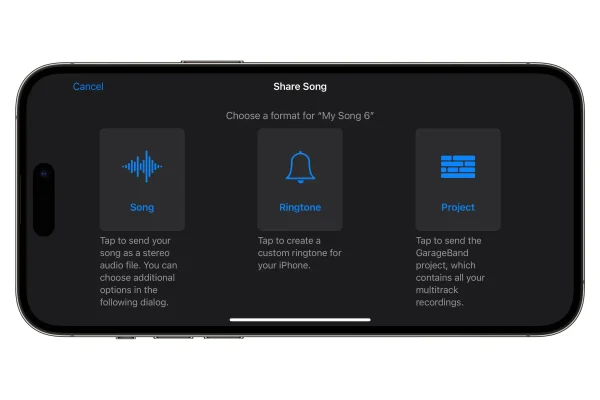
1. Once you’re happy with your chosen ringtone snippet, tap the “Share” button in the top right corner. It looks like a square with an upward arrow.
2. From the menu that appears, select “Ringtone”.
3. Give your new ringtone a memorable name (think “Awesome Guitar Solo” or “Mornings with Mozart“).
4. Tap “Export”. Your iPhone will process the ringtone and save it to your tones library.
Step 4: Ringtone Glory!
1. Head over to your iPhone’s Settings app.
2. Tap on “Sounds & Haptics”.
3. Under “Sounds and Haptic Patterns”, select “Ringtone”.
You’ll now see a list of all your available ringtones, including your newly created masterpiece! Find your custom ringtone by name and tap on it to set it as your default ringtone.
Bonus Tip: Setting Different Ringtones for Different Contacts
Want to personalize things even further? You can assign different ringtones to specific contacts in your iPhone’s address book. This way, you’ll know who’s calling just by the ringtone!
Now you can groove (or relax) every time your phone rings with the sound of your favorite song. Go forth and conquer the ringtone world with your newfound GarageBand skills!
FAQs: Ringing in the New with Custom Ringtones on iPhone
Q: Do I need a computer to set a song as my ringtone?
A: Nope! This method uses GarageBand, a free app pre-installed on your iPhone, so you don’t need a computer to create your custom ringtone.
Q: How long can my ringtone be?
A: While you can technically choose any length, ringtones typically work best when they’re short and catchy. Apple recommends keeping your ringtone under 30 seconds.
Q: What if I don’t have the song I want on my iPhone?
A: You can purchase the song from the iTunes Store before following these steps.
Q: Is there another way to create a ringtone without GarageBand?
A: There are third-party ringtone maker apps available on the App Store. However, these apps might require additional purchases or come with limitations.
Q: Can I set different ringtones for text messages?
A: Absolutely! The process is similar to setting a ringtone for calls. In Settings > Sounds & Haptics, you can choose a separate sound for “Text Tone” under “Sounds and Vibration Patterns”.
Leave a Reply